
Install
MSYS2(https://www.msys2.org/) 설치
https://github.com/msys2/msys2-installer/releases/download/2023-03-18/msys2-x86_64-20230318.exe
- 설치 경로 : C:\msys64

- 환경 변수 설정 확인 (사용자)
- 자동으로 되어 있는지 확인.
- C:\msys64\usr\bin

- 자동으로 되어 있는지 확인.
- CMD를 열어서 아래 명령어 입력 (C:\에서 진행)
-
cd C:\
pacman -S git patch unzip
Python 3.7.8(https://www.python.org/downloads/release/python-378/) 설치
https://www.python.org/ftp/python/3.7.8/python-3.7.8-amd64.exe
- 설치 경로 : C:\Users\durumary\AppData\Local\Programs\Python\Python37 (자동)
- 환경 변수 설정 (사용자)
- 사용자 환경 변수에서 Path 등록
- C:\Users\durumary\AppData\Local\Programs\Python\Python37
- C:\Users\durumary\AppData\Local\Programs\Python\Python37\Scripts
- 사용자 환경 변수에서 Path 등록


파이썬 버전 확인
Visual Studio 2019 설치
https://visualstudio.microsoft.com/ko/vs/older-downloads/
- 워크로드 설치
- C++를 사용한 데스크톱 개발
- 유니버설 Windows 플랫폼 개발
- Unity를 사용한 게임 개발

Bazel 4.1.0(https://bazel.build/install/windows?hl=ko) 설치
- Microsoft Visual C++ 재배포 가능 패키지
- 없으면 설치! 혹시나 모르니 실행하고 설치되어 있는지 확인.
- https://learn.microsoft.com/en-us/cpp/windows/latest-supported-vc-redist?view=msvc-170
- chocolatey 설치하기
- Powershell을 관리자 권한으로 실행 후 아래 명령어 입력
-
Set-ExecutionPolicy Bypass -Scope Process -Force; [System.Net.ServicePointManager]::SecurityProtocol = [System.Net.ServicePointManager]::SecurityProtocol -bor 3072; iex ((New-Object System.Net.WebClient).DownloadString('https://community.chocolatey.org/install.ps1'))
- Bazel 설치하기
- Powershell을 관리자 권한으로 실행 후 아래 명령어 입력
- YES/ALL/NO/PRINT 중 물어보면 그냥 ALL

- Bazel 버전 확인
-
choco install bazel --version 4.1.0 --force
- Powershell을 관리자 권한으로 실행 후 아래 명령어 입력
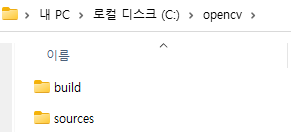
OpenCV 3.4.10(https://opencv.org/releases/page/3/) 설치
https://sourceforge.net/projects/opencvlibrary/files/3.4.10/opencv-3.4.10-vc14_vc15.exe/download
- 다운로드 후 C:/opencv 로 Extract

NuGet 5.11.3(https://www.nuget.org/downloads) 설치
https://dist.nuget.org/win-x86-commandline/v5.11.3/nuget.exe
- C:\에 nuget 폴더 만든 후 그 안에 nuget.exe 복사 붙여넣기.
- C:\nuget\nuget.exe

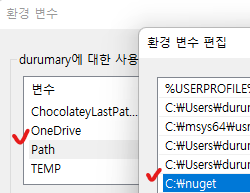
- 환경 변수 설정 (사용자)
- 사용자 환경 변수에 Path 등록
- C:\nuget
- 사용자 환경 변수에 Path 등록
git clone MediaPipeUnityPlugin
- **C:\에 git clone 하기 (CMD)**
-
cd C:\ git clone https://github.com/Arham-Aalam/MediaPipeUnityPlugin.git - WORKSPACE 수정 (C:\MediaPipeUnityPlugin\WORKSPACE)
- 수정 전 (파일 이름이 rules_cc-master → rules_cc-main으로 바뀌기도 했음)
-
http_archive( name = "rules_cc", strip_prefix = "rules_cc-master", urls = ["https://github.com/bazelbuild/rules_cc/archive/master.zip"], } - 수정 후

-
http_archive(
    name = "rules_cc",
    strip_prefix = "rules_cc-8bb0eb5c5ccd96b91753bb112096bb6993d16d13",
    urls = ["https://github.com/bazelbuild/rules_cc/archive/8bb0eb5.zip"],
)
- builde.py 수정(C:\MediaPipeUnityPlugin\build.py)
- argparse.BooleanOptionalAction → ‘store_true’로 수정

-
build_command_parser.add_argument('--resources', action='store_true', default=True)

uninstall_command_parser.add_argument('--desktop', action='store_true', default=True)
uninstall_command_parser.add_argument('--android', action='store_true', default=True)
uninstall_command_parser.add_argument('--ios', action='store_true', default=True)
uninstall_command_parser.add_argument('--resources', action='store_true', default=True)
uninstall_command_parser.add_argument('--protobuf', action='store_true', default=True)
- argparse.BooleanOptionalAction → ‘store_true’로 수정
virtualenv 설치 및 가상 환경 설정
- virtualenv 설치 (CMD)
-
cd C:\MediaPipeUnityPlugin
pip install virtualenv
virtualenv env
env\Scripts\activate

pip install numpy
Bazel 환경 변수 설정
- 지금부터 설정하는 환경 변수는 일회용이다. 즉, CMD를 끄면 휘발한다.
- CMD를 다시 열 때 마다 입력해줘야 한다. (반드시 버전과 경로를 확인하자!)
- BAZEL_VS (Visual Studio 2019 경로)
- C:\Program Files (x86)\Microsoft Visual Studio\2019\Community

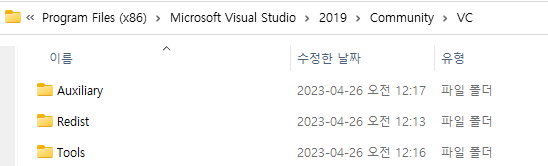
- BAZEL_VC (Visual Studio 2019/VC 경로)
- C:\Program Files (x86)\Microsoft Visual Studio\2019\Community\VC
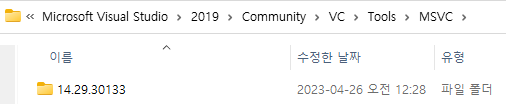
- BAZEL_VC_FULL_VERSION (VC\Tools\MSVC 버전)
- C:\Program Files (x86)\Microsoft Visual Studio\2019\Community\VC\Tools\MSVC\**14.29.30133**
- WINSDK_FULL_VERSION
- Visual Studio 2019 - Windows 10 SDK 버전 (10.0.19041.0)

- PYTHON_BIN_PATH (python.exe 경로)
- 가상 환경의 Scripts안에 들어 있다.
- C:\MediaPipeUnityPlugin\env\Scripts\python.exe

- BAZEL_VS (Visual Studio 2019 경로)
-
set BAZEL_VS=C:\Program Files (x86)\Microsoft Visual Studio\2019\Community
set BAZEL_VC=C:\Program Files (x86)\Microsoft Visual Studio\2019\Community\VC
set BAZEL_VC_FULL_VERSION=14.29.30133
set WINSDK_FULL_VERSION=10.0.19041.0
set PYTHON_BIN_PATH=C:\MediaPipeUnityPlugin\env\Scripts\python.exe
- CMD를 다시 열 때 마다 입력해줘야 한다. (반드시 버전과 경로를 확인하자!)
빌드
- 반드시 Bazel 환경 변수를 입력한 후 진행해야 한다.
-
python build.py build --desktop cpu --include_opencv_libs -v
Unity
- 유니티 버전은 2022.3.7f1로 테스트 했다.

- Face, Face Mesh, Holistic 등이 있지만 Hand만 테스트 했다.
Reference
https://github.com/Arham-Aalam/MediaPipeUnityPlugin
https://www.youtube.com/watch?v=eZbi08dNCOU&t=277s
모바일 빌드를 하고 싶다면?
Mediapipe plugin in Unity(Silicon Mac) - Build iOS
환경구성 Mediapipe plugin 다운로드 및 압축풀기 MediaPipeUnityPlugin v0.11.0 Release Note : MediaPipeUnityPlugin-Releases build.py 실행 환경 구성 및 실행 Homebrew 설치 Homebrew python 및 numpy 설치 brew install python export PATH=
limetimeline.tistory.com
Mediapipe plugin in Unity(Windows) - Build Android
환경구성 Mediapipe plugin 다운로드 및 압축풀기 MediaPipeUnityPlugin v0.11.0 Release Note : MediaPipeUnityPlugin-Releases build.py 실행 환경 구성 및 실행 이전 페이지의 Mediapipe-plugin-in-Unity를 참고하여 설치한다. Media
limetimeline.tistory.com
