1. 웹의 동작 개념 (HTML을 받는 경우)
웹 브라우저 : 서버에 웹 페이지(HTML)를 달라고 요청하고 받은 HTML 파일을 화면에 그려줌.
웹 페이지(HTML) 자체를 요청하지 않고 데이터만 요청할 경우 JOSN형식으로 받아옴.
=> 웹페이지는 고정인데 보여지는 데이터는 바뀜. (새로고침 안해도 막 바뀜)
2. HTML과 CSS
HTML : 구역과 텍스트를 나타내는 코드.
CSS : HTML로 잡은 구역을 꾸며줌. 기존의 HTML 내 style속성으로 꾸미는 것을 대체.
=> HTML 코드 내에 CSS 파일 불러와서 적용. (디자인 쪽에 가깝다. 코딩 능력과 예쁘게 만드는 것은 별개!!)
3. HTML 기본.
1) head와 body로 구성됨.
head : 페이지의 속성 정보 ex) meta, script, link, title 등...
body : 페이지의 내용.
<html>

<head>
	<title> 웹 페이지 제목 </title>
</head>

<body>
	<!-- 구역을 나누는 태그들 -->
    <div> 구역을 나눔 </div>
    <p> 문단 </p>
    <ul>
    	<li> ㆍ 표시가 나옴 </li>
    </ul>

    <!-- 구역 내 콘텐츠 태그들 -->
    <h1> 제목 .겁나큼 </h1>
    <h2> 소제목 </h2>
    <h3> h3~h6 숫자가 커질 수록 글자 크기는 작아짐 </h3>
    <hr>
    	<span style="color:red">span태그 글자 꾸밀 때 씀</span>
    <hr>
    	<a href="http://naver.com">하이퍼링크임</a>
    <hr>
    	img 태그 <img src="http://www.google.com/images..."/>
    <hr>
    	input 태그 <input type="text" />
    <hr>
    	button 태그 <button> 나는 버튼 </button>
    <hr>
    	textarea 태그 <textarea> ?? static text box </textarea>
 </body>

 </html>
4. 로그인 화면 만들어보기.
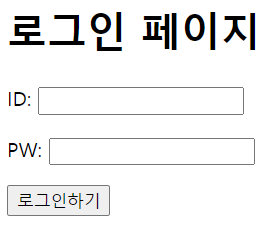
<html>
<head>
	<title>로그인 페이지</title>
</head>
<body>
	<h1>로그인 페이지</h1>
   	<p>ID: <input type="text"/></p>
   	<p>PW: <input type="text"/></p>
  	<button>로그인하기</button>
</body>
</html>
5. CSS란?
★ div의 관계가 중요하다. (적용된 div안의 내용 모두 적용 받기 때문.)

빨간 div가 초록, 파란 div 모두 포함한다.
즉, 빨간 div에 어떤 효과를 적용하면 초록, 파랑이에게도 상속된다.
<CSS 간단 코드>
<html>
<head>
	<style>
    	CSS 코드가 들어감.
    </style>
</head>
<body>
	공백!~
</body>
</html>
=> head안에 style안에 CSS코드가 들어 간다.
ㆍ 배경 관련
- background-color
- background-image
- background-size
ㆍ 사이즈
- width
- height
ㆍ 폰트
- font-size
- font-weight
- font-family
- color
ㆍ 간격
- margin
- padding
6. CSS 연습하기

<!DOCTYPE html>
<html lang="en">

<head>
    <meta charset="UTF-8">
    <meta name="viewport" content="width=device-width, initial-scale=1.0">
    <title>로그인페이지</title>
    <style>
        .mytitle {
            color: white;
            width: 300px;
            height: 200px;
            background-image: url('https://www.ancient-origins.net/sites/default/files/field/image/Agesilaus-II-cover.jpg');
            background-position: center;
            background-size: cover;

            border-radius: 10px;
            text-align: center;
            padding-top: 40px;
        }

        .wrap {
            margin: 10px auto;
            width: 300px;
        }
    </style>
</head>

<body>
    <div class="wrap">
        <div class="mytitle">
            <h1>로그인 페이지</h1>
            <h5>아이디, 비밀번호를 입력해주세요</h5>
        </div>
        <div>
            <p>
                ID: <input type="text" />
            </p>
            <p>
                PW: <input type="password" />
            </p>
        </div>
        <button>로그인하기</button>
    </div>
</body>

</html>
.mytitle이라는 함수(?)를 만들어서 안에다가 여러 속성을 정의.
백그라운드 이미지라던가.. 높이 넓이라던가..
그 안에 넣을 글들을 div로 묶어서 적음. (로그인페이지)
이 화면들을 가운데로 가져오려면.. width를 주고 margin: auto 사용. (그래도 안되면 display:block)
7. 폰트, 주석, CSS 파일 분리
1) 구글 웹폰트 입히기.
Google Fonts
Making the web more beautiful, fast, and open through great typography
fonts.google.com
원하는 폰트를 선택하고 ' + select this style '을 선택!
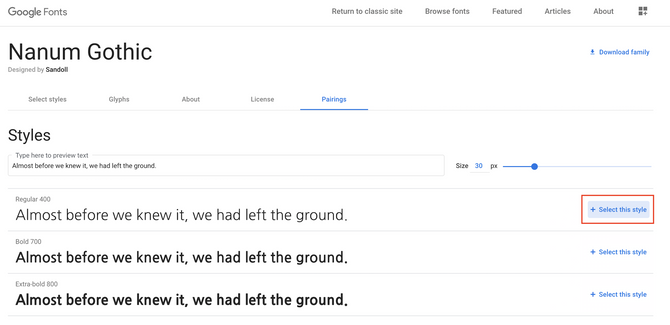

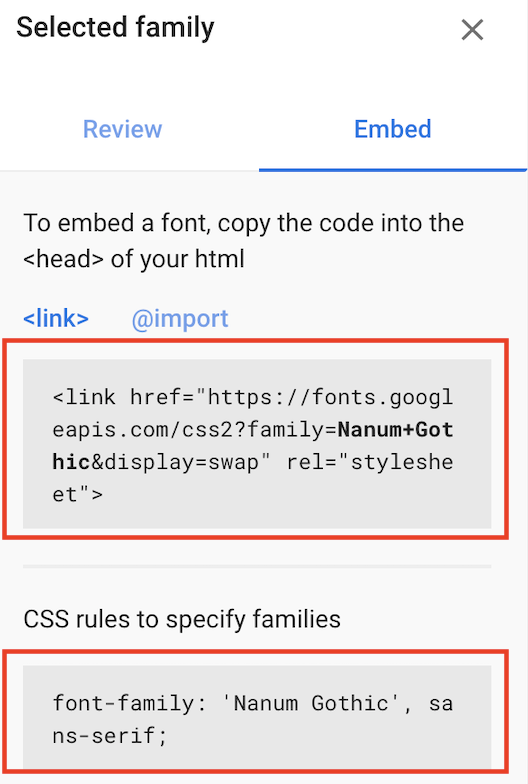
Nanum Gothic이라는 폰트를 예제로 추가해보면, 아래와 같은 코드를 복사하면 됩니다
<!-- HTML에 이 부분을 추가하고 -->
<link href="https://fonts.googleapis.com/css2?family=Nanum+Gothic&display=swap" rel="stylesheet">
/* CSS에 이 부분을 추가하면 완성! */
* {
font-family: 'Nanum Gothic', sans-serif;
}
2) 주석 : 안읽는다. <!-- 주석처리 -->
3) CSS 파일 분리
<!-- style.css 파일을 같은 폴더에 만들고, head 태그에서 불러오기 -->
<link rel="stylesheet" type="text/css" href = "(css파일이름).css">
CSS 코드를 html에 다 담으려면 보기 안좋으니까 새로운 CSS 파일을 생성해서 연동.
8. 부트스트랩
BootStrap : CSS를 미리 다 짜놓은 것을 모아둔 것.
<!doctype html>
<html lang="en">

<head>
    <!-- Required meta tags -->
    <meta charset="utf-8">
    <meta name="viewport" content="width=device-width, initial-scale=1, shrink-to-fit=no">

    <!-- Bootstrap CSS -->
    <link rel="stylesheet" href="https://maxcdn.bootstrapcdn.com/bootstrap/4.0.0/css/bootstrap.min.css"
        integrity="sha384-Gn5384xqQ1aoWXA+058RXPxPg6fy4IWvTNh0E263XmFcJlSAwiGgFAW/dAiS6JXm" crossorigin="anonymous">

    <!-- Optional JavaScript -->
    <!-- jQuery first, then Popper.js, then Bootstrap JS -->
    <script src="https://ajax.googleapis.com/ajax/libs/jquery/3.5.1/jquery.min.js"></script>
    <script src="https://cdnjs.cloudflare.com/ajax/libs/popper.js/1.12.9/umd/popper.min.js"
        integrity="sha384-ApNbgh9B+Y1QKtv3Rn7W3mgPxhU9K/ScQsAP7hUibX39j7fakFPskvXusvfa0b4Q"
        crossorigin="anonymous"></script>
    <script src="https://maxcdn.bootstrapcdn.com/bootstrap/4.0.0/js/bootstrap.min.js"
        integrity="sha384-JZR6Spejh4U02d8jOt6vLEHfe/JQGiRRSQQxSfFWpi1MquVdAyjUar5+76PVCmYl"
        crossorigin="anonymous"></script>

    <title>부트스트랩 연습하기</title>
</head>

<body>
    <h1>이걸로 시작해보죠!</h1>
</body>

</html>
<head> 사이에 script가 바로 부트스트랩 시작 템플릿
<!doctype html>
<html lang="en">
<head>
<!-- Required meta tags -->
<meta charset="utf-8">
<meta name="viewport" content="width=device-width, initial-scale=1, shrink-to-fit=no">
<!-- Bootstrap CSS -->
<link rel="stylesheet" href="https://maxcdn.bootstrapcdn.com/bootstrap/4.0.0/css/bootstrap.min.css"
integrity="sha384-Gn5384xqQ1aoWXA+058RXPxPg6fy4IWvTNh0E263XmFcJlSAwiGgFAW/dAiS6JXm" crossorigin="anonymous">
<!-- Optional JavaScript -->
<!-- jQuery first, then Popper.js, then Bootstrap JS -->
<script src="https://ajax.googleapis.com/ajax/libs/jquery/3.5.1/jquery.min.js"></script>
<script src="https://cdnjs.cloudflare.com/ajax/libs/popper.js/1.12.9/umd/popper.min.js"
integrity="sha384-ApNbgh9B+Y1QKtv3Rn7W3mgPxhU9K/ScQsAP7hUibX39j7fakFPskvXusvfa0b4Q"
crossorigin="anonymous"></script>
<script src="https://maxcdn.bootstrapcdn.com/bootstrap/4.0.0/js/bootstrap.min.js"
integrity="sha384-JZR6Spejh4U02d8jOt6vLEHfe/JQGiRRSQQxSfFWpi1MquVdAyjUar5+76PVCmYl"
crossorigin="anonymous"></script>
<title>스파르타코딩클럽 | 부트스트랩 연습하기</title>
<style>
.wrap {
width: 900px;
margin: auto;
}
</style>
</head>
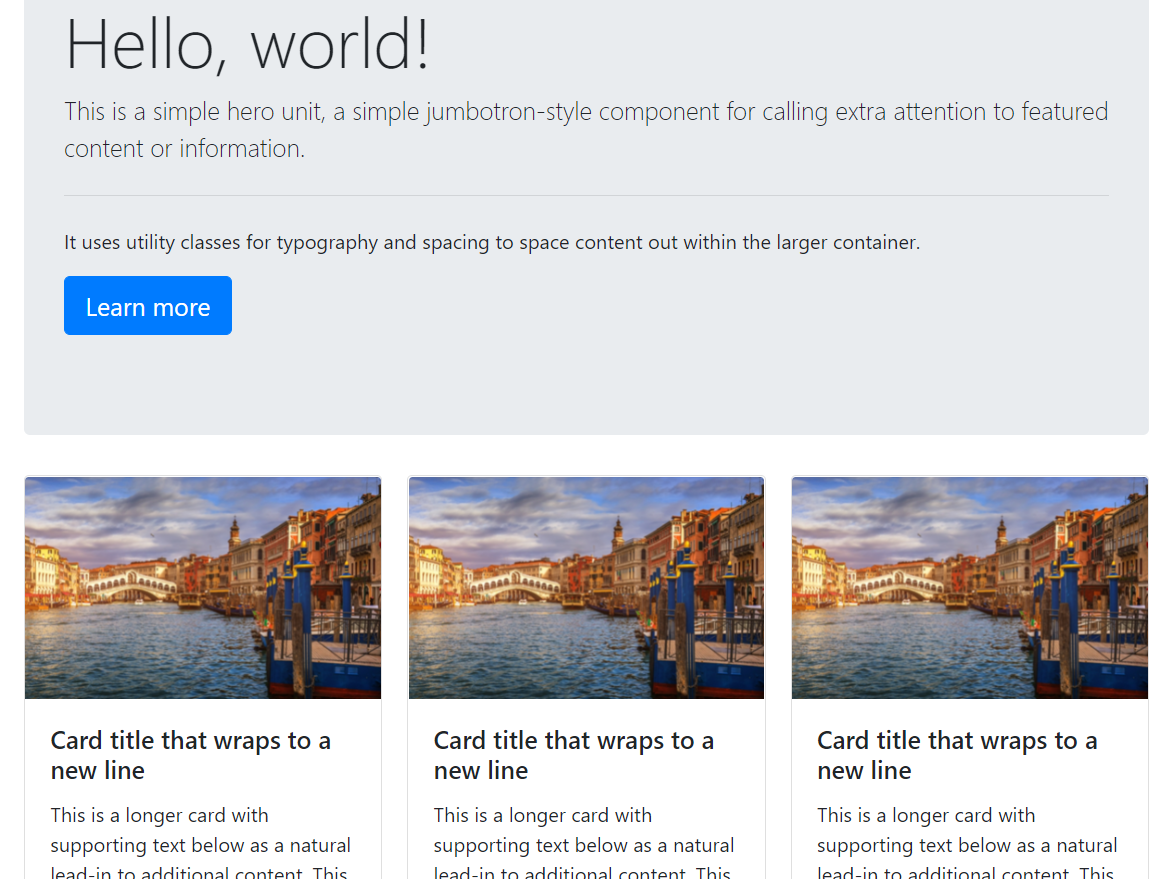
<body>
<div class="wrap">
<div class="jumbotron">
<h1 class="display-4">Hello, world!</h1>
<p class="lead">This is a simple hero unit, a simple jumbotron-style component for calling extra attention to
featured content or information.</p>
<hr class="my-4">
<p>It uses utility classes for typography and spacing to space content out within the larger container.</p>
<p class="lead">
<a class="btn btn-primary btn-lg" href="#" role="button">Learn more</a>
</p>
</div>
<div class="card-columns">
<div class="card">
<img class="card-img-top" src="https://image.theminda.com/data/tg/image/tour/middle/201905/c8aee858ed6e8c34010fe3c4ae9be8a5.jpg" alt="Card image cap">
<div class="card-body">
<h5 class="card-title">Card title that wraps to a new line</h5>
<p class="card-text">This is a longer card with supporting text below as a natural lead-in to additional
content. This content is a little bit longer.</p>
</div>
</div>
</div>
</div>
</body>
</html>
9. JavaScript
클라이언트가 서버에게 요청하면 서버는 HTML + CSS + JavaScript를 준다.
다른 프로그래밍 언어 중 왜 하필 JavaScript냐?
JavaScript가 그 시장을 먹어서 그냥 표준화 시켰다. 그래서 쓴다.
Java랑은 아무런 관련이 없다고 한다.
function hey(){
	alert('안녕!');
}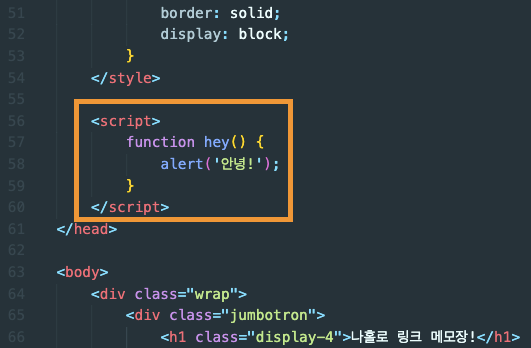
head 사이에 <script> 사이에 넣는다.
<script> </script>는 자바스크립를 작성한다는 의미.
<button onclick="hey()" type="button" class="btn btn-primary">기사저장</button>바디 부분에 이렇게 넣어주면?!
버튼을 누르면 경고창이 뜨는 것을 확인할 수 있다!!
